Showing posts with label Sharepoint. Show all posts

Saturday, August 20, 2011

Copy attachment from one list to another list

This is really interesting stuff because this topic not only covers how to copy attachment(s) from one list to another but also shows parent child relationship between lists.

I had a list and also related sub list, the idea was very simple I had to have one more field in the list which has column called ParentID.

I had attached event handler to the parent list and in the handler I was fetching the assigned to group. So I had to get all users from that group and assign it to each individual, but I also need to track that these all entries are for particular item from parent.

So I wrote a simple handler and in item adding event I copied same list item to all users of Assignedto field from parent in the another list.

All went well, another requirement came in, and if parent is updated then all child items in another list also should be updated. Idea was very simple, but this is tricky. Why tricky? Because if by mistake it is assigned to incorrect group and have to be assigned to two groups at a time, then the best way to do is Get the item id in ItemUpdated event and then fetch all Parent ID from child list and delete all list items and then re insert.

You might think why not to update? Well, I leave up to you. Think about the scenario which I have mentioned above of updating with two or more groups at a time, there can be couple of individuals as well. You need to update all these data. At the end, you will say, yes deleting all list items and reinserting is better. If you feel, updating is better. Leave your comments. I would love to ask you questions. :)

Another requirement came. If item from parent gets deleted, all child items from another list should also be deleted. Again the scenario is very simple, In ItemDeleting event, get the ID of the list item, find all those ParentID items from the child list and then delete those list items from another child list.

Now the challenging part came in, if I add or update and attach multiple attachments, it should also get copied over another list items with Parent ID.

I have already written my code in ItemAdding. I went ahead and wrote a code for getting list item’s attachment. But wait, the main part is you can never have attachments of list item in ItemAdding event because Item has not actually been inserted to the list. So in ItemAdding you can never get attachments.

So the idea was to change the code from ItemAdding to ItemAdded. And guess what, yes I found the attachments there in Item Added event.

o here is a sample code which demonstrate you how to copy list item attachments to another list item.

spWeb.AllowUnsafeUpdates = true;

foreach (string AttachName in EventItem.Attachments)
{

SPFile oSpFile =
EventItem.ParentList.ParentWeb.GetFile(EventItem.Attachments.UrlPrefix + AttachName);
item.Attachments.Add(AttachName, oSpFile.OpenBinary());

}

item.Update();

spWeb.AllowUnsafeUpdates = false;

Where EventItem is source list item and item is destination list item.

So it is very simple to copy attachments from one list item to another list item in event handler.

Source::sharepointkings

Monday, June 1, 2009

The My Links Web Part – It’s Not Just for My Sites #sharepoint

If you aren’t familiar with My Links, it’s a great place to store those things you might normally store in your Internet Explorer Favorites or Firefox Bookmarks. The advantage to using My Links is that they are always available to you anywhere you are logged into SharePoint. So, if you log in on a different computer, your links are there. And the links can go anywhere; they don’t have to be links to SharePoint locations. Here is a screenshot of how My Links is usually accessed in SharePoint.
image

Yesterday, just for fun, I decided to try an experiment; and my experiment worked! I added a My LInks web part to my My Site. Then I exported it and saved it to my desktop.
image

Next I went to the home page of my portal, made the page editable, and clicked on Add a Web Part for one of the web part zones. I closed the Add Web Parts dialog by clicking on the link at the bottom for the Advanced Web Part gallery and options. This opened the Add Web Parts Tool Pane in the right-hand side of my browser. At the top I clicked on the down arrow beside Browse and selected Import.
image

I browsed to and selected the My_Links.dwp web part I had saved to my desktop and clicked the Upload button.

1

To finish, I just drug the My Links web part where I wanted it on the page and published the page. All my links were then showing up on the page and as I logged in as different test users, their links showed up as well, as expected.

image


refrence::http://sharepointsolutions.blogspot.com/

Calling the SharePoint Web Services with jQuery

If you read this blog you probably know that besides the web user interface, SharePoint also exposes some interfaces which you can use from code: the SharePoint object model and the SharePoint web services. The object model of SharePoint can only be used by code/applications that are running on a SharePoint server in your Server Farm, so you can’t use the object model on client machines. The SharePoint web services can be used of course across a network boundary, that’s what they are built for! In this post I’m going to show you how you can access the out-of-the-box SharePoint web services by making use of the jQuery Javascript library. First let’s see what you can do with this technique: download this zip file that contains an ASPX page (a basic Site Page without any code behind), and the jQuery Javascript library (in case you don’t have it already). Upload the two individual files (not the zip file) in the root of a Document Library in any of your SharePoint sites. You can do this by making use of the web user interface; you don’t have to touch anything on the server itself. When done, just click on the link of the uploaded ASPX and you’ll see following page:


Probably you’re not really impressed but think about the fact that this page is just an ASPX file you’ve uploaded through the web user interface, there is absolutely no code behind involved (which would have been blocked by SharePoint’s default security settings). The details of the SharePoint lists are loaded by making use of Javascript code that calls the web SharePoint lists.asmx web service.

So how do you call a SharePoint web service in Javascript code; well you can use the XmlHttpRequest object and write lots of boring code, or you can make use of a Javascript library that wraps this XmlHttpRequest object and exposes a nice and easy interface. In this demo I’ll use the jQuery Javascript library, so the first thing that you’ll need to do is to make sure the page is loading that library:

If you already configured your SharePoint site so the jQuery library is loaded (for example by making use of the SmartTools.jQuery component), you can skip this line of course.

When the page is loaded, the Lists web service (e.g. http://yoursite/_vti_bin/lists.asmx) of SharePoint needs to be called; this can be accomplished by making use of the jQuery’s ajax method. This method can post the necessary SOAP envelope message to the Lists web service. The XML of the SOAP envelope can easily be copied from the .NET web service test form of the desired web method (e.g. http://yoursite/_vti_bin/lists.asmx?op=GetListCollection). In the code below, a call to the GetListCollection web method is made when the page is loaded. The complete parameter of the ajax method is actually a pointer to another Javascript function (which we’ll implement later on) that will be called asynchronously when the web service call is done. Don’t forget to update the url parameter with your SharePoint site’s URL!

$(document).ready(function() {
var soapEnv =
" \
\
\
\
\
";

$.ajax({
url: "
http://yoursite/_vti_bin/lists.asmx",
type: "POST",
dataType: "xml",
data: soapEnv,
complete: processResult,
contentType: "text/xml; charset=\"utf-8\""
});
});

As I already mentioned, the processResult function is called when the response XML of the web service call is received. In this method a loop is created which will iterate over every List element of the response XML. For every List element a

  • element is added to the element with the ID attribute set to data.

    function processResult(xData, status) {
    $(xData.responseXML).find("List").each(function() {
    $("#data").append("

  • " + $(this).attr("Title") + "
  • ");
    });
    }

    This data element is the actual

      list in HTML:

        When you put everything together in a Site Page, this is the result:


        In the zip file mentioned in the beginning of this post, you can find an extended version of the processResult function which will display some additional metadata for every list (like the ID, ItemCount etc). The entire contents of basic version of the Site Page built in this post goes as follows:

        <%@ Page Language="C#" MasterPageFile="~masterurl/default.master" %>


          List Details


          List Details


          Refrence::

          Jan Tielens' Bloggings

          SSRS 2008 Add-in for SharePoint

          Unless you are living under the rock , you’d probably know that since SQL Server 2005 SP2 time frame , you can configure a deployment of SQL Server Reporting Services to work with a deployment of SharePoint - known as SSRS 2008 installation in SharePoint Integrated mode. In the first attempt to combine their Business intelligence and Information Portal technologies together and by releasing SQL Server 2005 SP2 , Microsoft brought two very interesting technologies together and opened up a world of interest to many people including myself . When I first read about SP2 , I was like wait a minute, this is awesome! Both products that I had been really passionate about for years now are getting much closer! Needless to say that I’ve always appreciated the efforts Microsoft has put into making the technology , geekyness and weirdness around it transparent to the vast majority of people out there.

          When SQL Server 2005 SP2 was released , MS really demonstrated that not only do they listen to their customer feedback, they also care so much about developers and to make their life easier. For example , in the context of SharePoint and SSRS integration , now you can potentially hire a report developer,they can build the reports (in much easier way) and publish them into SharePoint and basically hand them over to the user community and business users. From here , they can take the wheel, manage and interact with these reports (high level) without having to know what the hell is going on under the hood! Isn’t that amazing that how two completely different technologies can be combined to make things much easier for everyone? Remember, easier something is, more people will use it. More people use it, more popular you’ll become! Microsoft ,for sure, has proved that they’ve learned this very simple rule of life…

          The only thing that tipped me over the edge at that time was when I first attempted to bring the the best out of both products in a “real” integration project with a very “difficult-to-get-along” kind of client! (I still have the nightmare of those two days) . I really don’t want to talk about those issues here , but what made it difficult for me was no proper documentation , no active community around both products and , to an extend, the immaturity of the integration . Things certainly have changed since then and obviously I’ve learned my “integration” lessons as well! Not that I don’t face any issues these days, but nowadays it’s much easier to find an answer - and yes , I find the answers to the majority of my questions in the blogs of those who are blessed and willing to SHARE their POINTS with the rest of the world!

          When SQL Server 2008 and SSRS 2008 was RTMed , I didn’t make the same mistake I had made back in 2005 :) . I decided to to gain some home-based lab experiences before I go live with this in real engagements (Didn’t I just tell you that I learnt my integration lessons? ;) ) Surprisingly, every installations I had at my home-based farms from a single stand-alone installation to a scale-out SSRS along with a large SharePoint Server farm went really smooth without big stucking points. Documentation around the integration is much better this time around, but I am still not happy by the coverage of SSRS 2008 and SharePoint integration by MS people and community! Let’s hope it gets better soon.

          Speaking of SSRS 2008 Add-in for SharePoint, here is one question that I frequently get asked :

          I have configured report server in SharePoint integrated mode. I have installed SharePoint Web front-end components on the report server computer.I have downloaded and installed the Reporting Services Add-in for SharePoint Technologies on my other Web front-end servers (including the one that hosts the Central administation site) , but Reporting Services section doesn’t appear in the Central Administration site;therefore I cannot complete the integration. Where did it go?

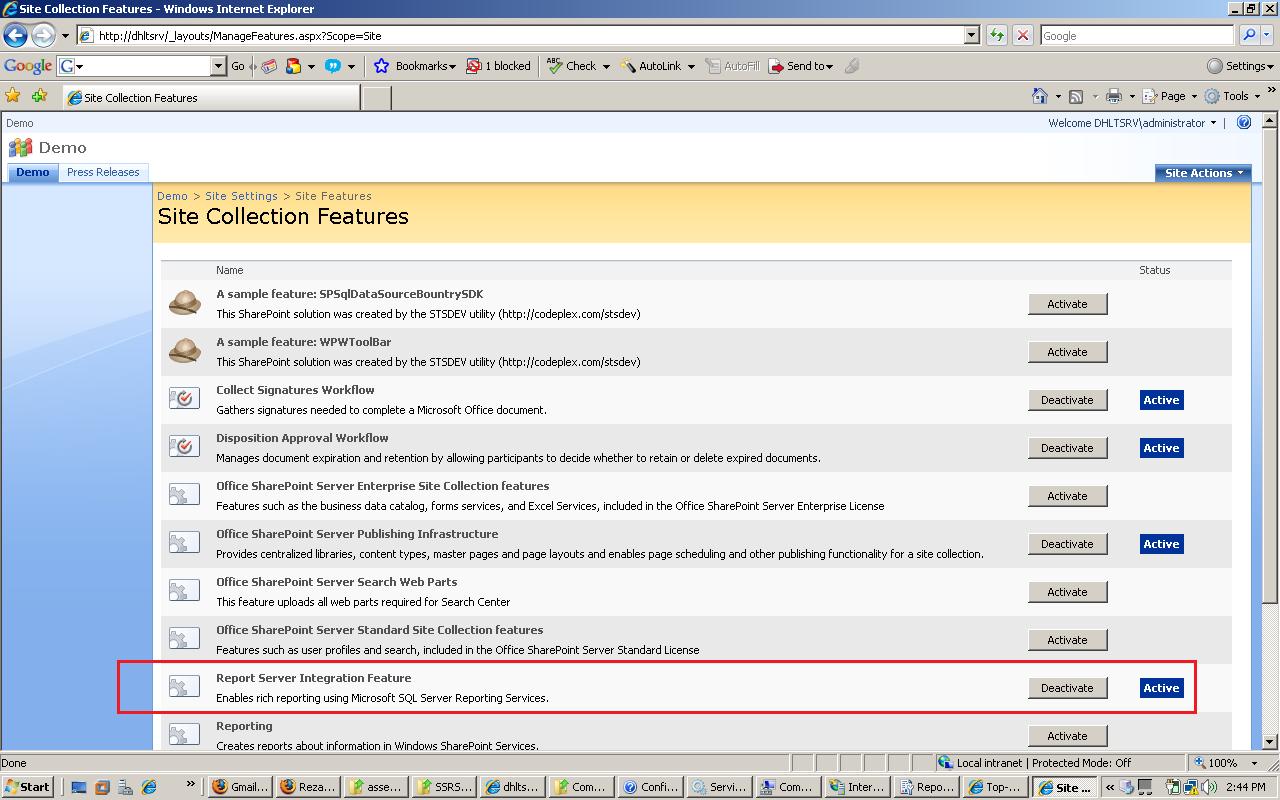
          Well , the answer is : You need to activate a site collection-scoped feature called Report Server Integration Feature on the Central Administration site.

          CentralAdminReportServerIntegrationFeatureAtSiteCollectionLevel

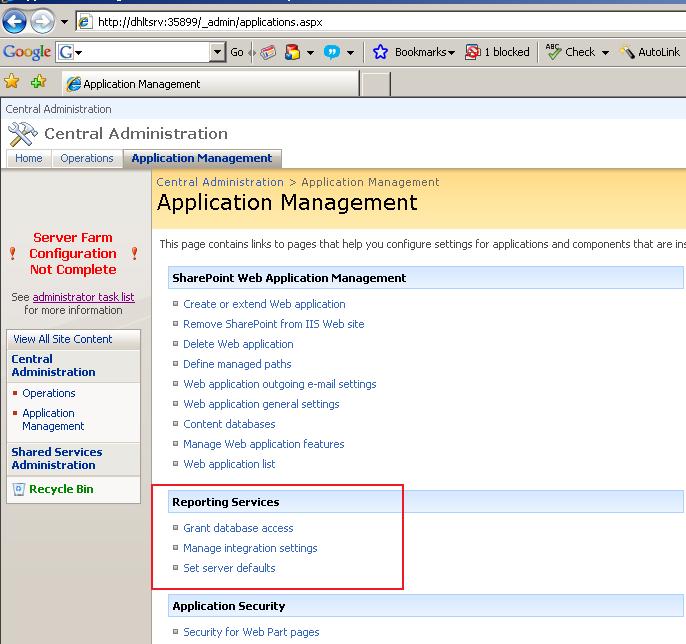
          This feature has two different behaviors when gets activated on Central administration site than other sites. When activated on the Central administration site , the feature does all of the things it does for other type of sites , plus it adds a section called Reporting Services under the Application Management. This section must be used to make sure SharePoint is aware of my SSRS instance existence. Here is where the fun part starts :) .

          There are three options in this section:

          SSRSCustomSectionCentralAdmin

          1. Grant Database Access: First you need to specify the server which hosts reporting services database, whether it is on a default or named instances. Essentially what happens here is that the Report Server endpoint and Windows service accounts for that instance (named or default) will be granted required access to the SharePoint databases. During this process, the Report Server service will be restarted. This is an essential step in integration.
          2. Manage integration settings : You need to specify Report server URL and the authentication. Pretty straightforward.
          3. Set Server Defaults :You set all of your basic defaults. This page contains all of the things you’d normally use Reporting Services Configuration tool to configure them, but they are now managed via SharePoint tier. For example making sure that all data sources use integrated security, so on and so forth. Ad-hoc reporting is also a powerful feature which can be set and controlled from here.

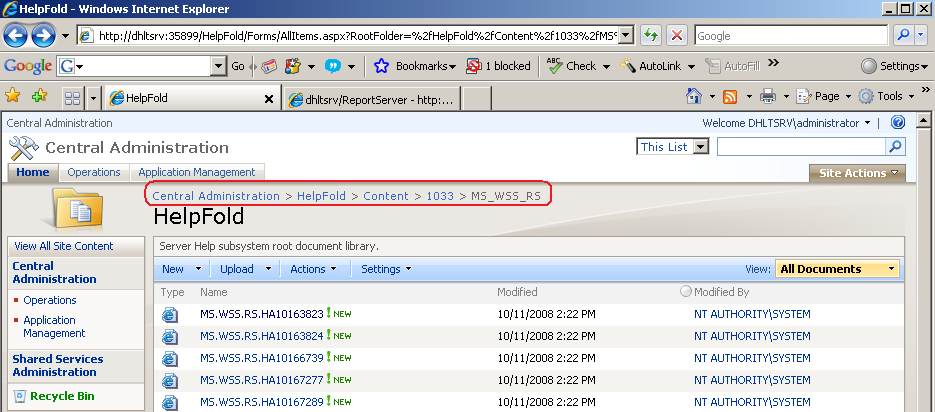
          There is one more action that Reporting Services Add-in for SharePoint Technologies performs on the Central Administration site which is provisioning SSRS integrated help content in the HelpFold folder:

          HelpFolder

          The add-in also installs some application pages, including pages that you open in Central Administration to set the report server URL and other integration settings in Central Administration and other sites.

          ReportServerLayoutPictures

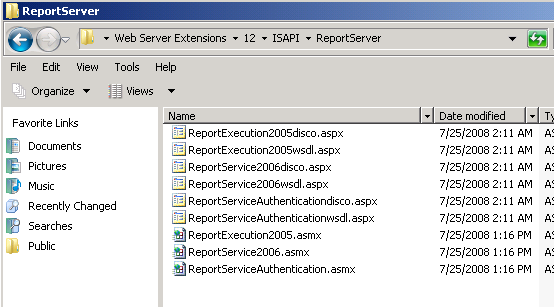
          In addition to the application pages , the Proxy endpoints are also placed in the 12\ISAPI\ReportServer folder. As you can tell , all of the Reporting Services Proxy endpoints are nicely virtualized and context aware (note wsdl and disco aspx file for each Web service). This means that no matter how deep you are in each site collection , these endpoints are always accessible via a call to the respective asmx file - for example http://mysite/_vti_bin/ReportServer/ReportServer2006.asmx or http://mysite/subsite1/…../subsiteN/_vti_bin/ReportServer/ReportServer2006.asmx.

          More on SSRS Proxy endpoints in the Integrated mode can be found here.

          ISAPI Files

          A quick list of proxy endpoints here:

          1. ReportService2006.asmx : Proxy endpoint to support SharePoint Integrated mode. New functionalities such as Data Driven subscriptions are added to this endpoint.
          2. ReportExecution2005.asmx : Execution endpoint. New functionalities such as On demand load (a.k.a pagination) is added to this endpoint.
          3. As you can tell , ReportService.asmx (SSRS 2000 SOAP endpoint) which was deprecated in 2005 , now is removed and no longer supported!
          4. ReportService2005.asmx: Proxy endpoint to support Native mode (not in this picture- I hope you know why :) )

          All right , let’s just go ahead and see what happens to non-Central admin sites :

          First of all , the same feature that we just activated in the Central administration site appears on every site collection meaning that if you want to have the Reporting Services integration , you need to activate this on each site collection:
          ReportServerIntegrationFeatureAtSiteCollectionLevel

          Once you activate this feature , the following things will be added to your site collection:

          Required content types:

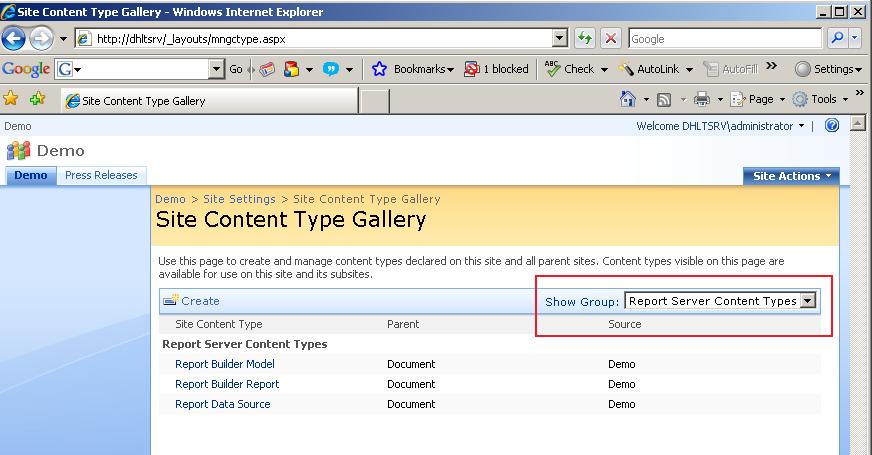
          ReportsContentType

          Report Viewer Web part:

          ReportViwerWebPart

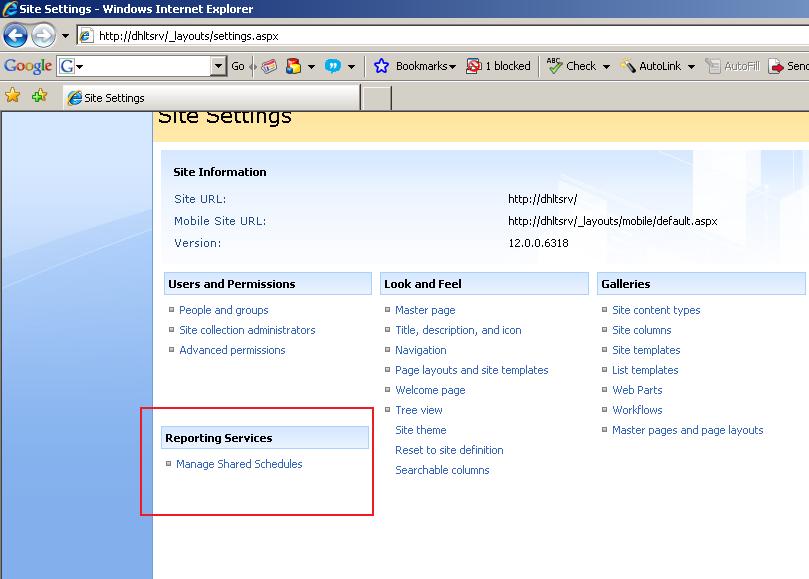
          A section in the Site Settings for managing shared schedules :

          Site Settings

          Obviously if you want to be able to store your reports in a Report Library and your data sources in Data Connection Library , you need to enable another web-scoped “Office SharePoint Server Enterprise Site features” feature to get Report Library and Data Connection Library in the create page. This has nothing to do with SSRS Add-in though !

          EnterpriseFeaturesAtSiteCollectionLevel

          That’s all about it! I hope this blog post can help you verify your SSRS 2008 installation in integration mode.

          refrence::

          Reza Alirezaei’s Blog

          Integrating SharePoint 2007 and jQuery


          In the first part of this article I'll talk about how you can enable the jQuery JavaScript library in SharePoint 2007 sites and pages. The second part of this article will focus on using jQuery in SharePoint 2007 sites and pages.

          When I was at PDC’08, I attended a session about the jQuery JavaScript library (watch online). A few weeks before that Scott Guthrie announced that Microsoft would support, and even ship jQuery together with Visual Studio, along with Microsoft’s own AJAX implementation: ASP.NET AJAX. If you’ve never heard about jQuery, I defenitly recommend you to to check it out, there are some great tutorials available. The defenition of jQuery reads: "jQuery is a fast and concise JavaScript Library that simplifies HTML document traversing, event handling, animating, and Ajax interactions for rapid web development. jQuery is designed to change the way that you write JavaScript." In my opinion jQuery is great because it simplifies a lot the JavaScript that you have to write if you’d like to do fancy AJAX stuff, selecting HTML elements for example is a breeze. Secondly jQuery has a big community that develops plugins for various scenarios. I already wrote and talked quite a bit about integrating ASP.NET AJAX with SharePoint 2007, so let’s check out how you can integrate jQuery as well!

          First things first: you need to get the jQuery library from the official website. It comes in three varieties: uncompressed (with debug information, use it while you develop), packed (smaller, use it for production) and minified (needs to be uncompressed at the client, so slower but even smaller). The jQuery library is just a JavaScript (JS) file, so it can be loaded from any web page (html, aspx, etc). If you’d like to have IntelliSense when writing code in Visual Studio 2008 for jQuery (highly recommended of course), you need to download a Visual Studio hotfix. Now you’re good to go to make use of jQuery in your development environment.

          Before I show you some things you can accomplish with jQuery in your SharePoint sites, let’s think about how we can make the jQuery library available on the ASPX pages of our SharePoint sites. There are two things that need to be done: first the JS file (the library itself) should be deployed to a location which can be accessed by SharePoint pages, secondly the library should be loaded by the SharePoint pages.

          Deploying the jQuery JS file is quite easy: I recommend deploying it to the C:\Program Files\Common Files\Microsoft Shared\web server extensions\12\TEMPLATE\LAYOUTS folder on every Front End Web Server of your SharePoint Server Farm. By doing so, the file can be loaded by making use of the URL http://yoursite/_layouts/ jquery-1.2.6.min.js or http://yoursite/subsite/_layouts/ jquery-1.2.6.min.js, since the _layouts part of the URL always points to the LAYOUTS folder in the 12-hive.

          Making sure that SharePoint pages will load the library can be accomplished in a couple of ways:

          1) Load the library in the page you want to use it
          This can be done very easily by adding for example a Content Editor Web Part to the page (or modifying the page with an editor), containing the following HTML:

          2) Add the script to the master page
          You can add the same script tag to the master page that is used by your SharePoint sites as well, typically in the HEAD tag:


          . . .

          . . .

          This may look very easy, but remember modifying out-of-the-box files in the 12 hive is typically not supported. So if your sites use the default master page, this is a no-go. Additionally it could be that you’ve to multiple master pages (e.g. system and site master pages) which complicate the situation.

          3) Use the AdditionalPageHead Delegate Control (my favorite!)
          By providing the contents for the AdditionalPageHead Delegate Control that is used by all the out-of-the-box master pages, you can make sure the the jQuery library is loaded by all the SharePoint pages. The AdditionalPageHead Delegate Control allows multiple controls to provide contents, so it’s a great extensibility scenario. To accomplish this you need to build a web user control (ASCX file), that contains the script tag to load the jQuery library:

          <%@ Control Language="VB" ClassName="jQueryControl" %>

          There is no code-behind file required. This control needs to be deployed to the C:\Program Files\Common Files\Microsoft Shared\web server extensions\12\TEMPLATE\CONTROLTEMPLATES folder on the hard drive of every SharePoint Front End Web Server. Additionally you need to have a feature that will add the control to the AdditionalPageHead Delegate Control, the feature’s manifest will look like this (assuming the control is named jQueryControl.ascx):


          The feature can be scoped to any level, when it’s activated on a certain level, all the pages will automatically have the script tag in their HEAD tags. Pretty cool, isn’t it?

          You can do all of this manually, but it’s of course much nicer to package the jQuery library JS file, the user control and the corresponding feature into a SharePoint Solution (WSP). I’ve created a sample Solution file, that contains a feature scoped to the Web level so the jQuery library can easily be deployed and enabled or disabled per SharePoint site. There is also an installer available that guides you through the installation process by making use of a nice wizard. You can find the solution, installer and sources as a part of the SmartTools project on CodePlex (direct link to the releases).

          Ok, now we are ready to make use of jQuery in our SharePoint sites, in the second part of this article I'll show you some cool stuff you can do by integrating jQuery with SharePoint 2007.


          Refrence ::

          Jan Tielens' Bloggings

          Tuesday, January 6, 2009

          Share Point Overview

          Introduction

          In this series of articles I'm going to be looking at Windows SharePoint Services 3.0, which we'll abbreviate to WSS3 from here on. WSS3 is the free version of SharePoint whereas Microsoft Office SharePoint Server 2007 (MOSS) is its big, commercial brother. It is its brother however and is closely related. We're going to focus almost exclusively on WSS3 but will mention MOSS occasionally along the way. MOSS is entirely based on WSS3.0 though it does provide a number of additions. WSS3 is a capable and not insubstantial item of software in itself however.

          I am going to assume you know a little (though only a little) about SharePoint technologies in that you have used either WSS3, MOSS or a previous version of SharePoint though perhaps only from an end user's perspective (though an end user can do a fair bit in SharePoint!) It is also assumed later in the series that the reader is a competent ASP.net 2.0 programmer and knows about things like master pages and web parts.

          In the first few articles in this series we will largely be introducing and exploring the copious number of features available out of the box with WSS but just a quick early note on the required development environment in case this puts anyone off at this early stage. WSS3 installs on Windows Server only so it is not going to be easy developing for SharePoint unless you have access to such an environment. This means either an accessible server (which may be your main machine) or a virtual machine on your primary development machine if running a client OS, for example via Microsoft’s free Virtual PC product (see Microsoft downloads). We may discuss the pros and cons of each approach nearer the time but here's a brief spec for a development environment: Windows Server 2003 R2 with WSS 3.0, .NET 3.0, SQL Server (2000/2005/Express) and VS 2005. We'll leave that topic for now but will return to development issues for the second half/ two thirds of this article series.

          Talking of the future ... what is the plan? See below – these are the subjects we'll be covering approximately. The odd topic may force its way in as we progress.

          An introduction to WSS3, in particular the architecture and key concepts in overview

          WSS3 Out of the Box – unsurprisingly a look at using some of the out of the box features of WSS3

          Security - Authentication and Authorisation

          Basic Customisation of WSS3

          Site Definitions – sites are a key building block of WSS3 so site definitions are also key

          Features – these are components of functionality that can be activated at different levels within WSS3

          Web Services – in WSS3 the API is exposed via Web Services

          Web Parts – pretty central in development terms

          WSS3 Object Model – ditto!

          Custom Field Types – in WSS3 you can extend the definitions of field types

          Events

          Workflow – based on .NET 3.0 WF

          Performance

          So, in this article we are going to introduce the WSS v3 architecture and key concepts such as sites, site collections, workflow, master pages, web parts and content types.

          The main reference for this series of articles is Todd Bleeker’s 'Developers Guide To Windows SharePoint Services3.0', one of the early books available on WSS3 development.

          WSS3 Logical and Physical Architecture

          The architectural hardware model is designed to be scalable with 3 logical tiers: front end web server(s) (IIS), search server(s) and database server(s) (content and configuration). This logical model can be physically deployed on any number of servers, 1 upwards.

          Administration

          Application administration is exposed via two main avenues in WSS: via SharePoint Central Administration – a web site in its own right – and via the standard functionality exposed to the admin roles via the SharePoint site. The SharePoint administration model includes support for the following roles:

          • Server (farm) admin – the overall management of a server (farm) is achieved via the comprehensive SharePoint Central Administration tool, e.g. email settings, database content servers and backups.
          • Site collection admin – sites are divided into hierarchical site collections and these provide an administrative unit. The site collection administrator can set quotas and manage users across all sites in the collection.
          • Site admin – the site administrators can create and manage site content elements as well as the security thereof.
          • Shared services admin (MOSS only) – MOSS also supports the administration of key MOSS only services).

          It is also important to note that the command line tool stsadmin is an essential tool for the more technical SharePoint administrator. More of this tool in later chapters.

          Site Collections

          A site collection is a hierarchy of WSS web sites (aka workspaces/ webs/ sites – we'll try and settle on the latter). They share elements such as a templates, workflows, site columns, master pages and content types (more of which later but the reader should be aware of most of these concepts already). Sites within a site collection can share content and navigational elements.

          The default permissions and permissions groups for a site collection are:

          • Full control: as says
          • Design: can edit lists, document libraries, and pages in the site
          • Contribute: can view pages and edit list items/ documents
          • Read: can view pages, list items/ documents

          On installation and by default a single site collection /web application is created. Further site collections may be created from the SharePoint Central Administration site (subsequently CA assuming I remember). The CA is accessible directly on the server under admin tools or via the CA URL. The required option is Application Management – Create or Extend web application – Create new Web Application. By default:

          • NLTM authentication will be used
          • anonymous access will not be permitted

          It is also recommended that

          • a new IIS application pool should be used
          • the database name should be linked to that of the site collection (so you can easily work out which database corresponds to which site collection)

          You may need to recycle the application pool before you use the new site collection as configuration information is cached and may need to be forced to reset. The easiest/ best way to do this is to right click on the application pool in IIS and select recycle.

          Web sites and Workspaces

          A (web) site is a collection of zero or more lists and libraries and the pages that manage them. Security may be inherited or unique among the various webs within a site collection, definable by the site admin. Sites can have their own content types and site columns. More of which shortly.

          Workspaces are just sites really. They are, however, predisposed due to the nature of their included lists and libraries to specific business activities. Types of workspace include the document workspace and a variety of meeting workspaces. Document workspaces can be created from a document library (see next section) in WSS or from Office client software.

          Microsoft Office SharePoint Designer 2007 (subsequently SPD) can be used to edit sites and their sub-objects simply by pointing SPD at the URL of the web site, as one would have done with Frontpage, which is no coincidence as SPD is the evolution of Frontpage. Note that a WSS3 site uses a shared template page on the file system in a site template definition. Customising a page, through SPD for example, forces it to stop using this template page and for the new ‘template’ to be stored in the content database. In WSS2 this was referred to as 'unghosting' a page and is a terminology that is likely to continue. Note that a) SPD provides a warning when this is about to happen and b) SPD allows the process to be reversed.

          Lists and Libraries

          Sites in SharePoint are comprised of lists and their close bedfellow, libraries. A list is a place to store data. A (document) library is a special type of list modelled more on the concept of file systems folders for storing documents. Lists rely on the concept of columns (aka fields or attributes) – an item of information about the type of list, e.g. name of a document. In turn views rely on columns – specific views of the list data based on criteria applied against the columns.

          Enhancements in WSS3

          • Site columns provide a way to create a column that will be used by several different content types and/or lists. They offer a way to enforce consistency and reusability of columns across a site or list.
          • A content type is a collection of settings that can be applied to a particular category of content. So multiple types of content can be managed from a single list or library. For example, documents and presentations could be stored in the same document library but have different columns, templates, workflows and behaviours associated with them.
          • List improvements – several capabilities that previously only existed for libraries have been extended to lists, and vice versa.
            • Events – fire before and after an action has occurred and can be coded against
            • Folder creation and versioning is also now supported for lists
          • Security enhancements – permissions are now specifiable down to the list item level and the UI has been improved in terms of better context sensitive security menu options
          • RSS feeds are available for every list and document library created
          • Workflow – Windows Workflow Foundation (WF) provides a programming framework and tools for developing and executing a wide variety of workflow-based applications. WSS3 provides the infrastructure to manage workflow execution, allow workflows to exist for long periods of time, create and respond to workflow tasks and track the history of workflow and the objects it affects (lists and library items). Thus WSS3 workflow allows the creation, management and tracking of a series of actions based on a business process in WSS3. For example, a task could be generated for the Quality Manager to approve any new document uploaded to the quality system document library. The actions that occur in a workflow can be initiated automatically by WSS3 or can be manually initiated by the user. As you might expect workflows are available to lists and libraries. While multiple workflows may be made available for a single list item, only one instance of a workflow can run on an item at any one time. Workflows can be created for a specific list using the SPD wizard. More advanced and centralised workflows can be created using VS.net.

          Galleries

          WSS2 introduced the concept of the gallery for site templates, list templates and web parts. Once added to a site collection gallery an item was available for use throughout the site collection. This has changed a little in WSS3. Instead of there being a single gallery for a site collection each site has a gallery. With each site items may be shared between a parent and its children; items such as columns, content types and workflows. The full list of gallery types is now:

          • Master pages
            With the fact that WSS3 is built on ASP.net 2.0 come master pages which help preserve presentational consistency via the sharing of interface elements across all pages of an application. Developers can then also focus on the content unique to each page. A web form (ASP.net 2.0 page) associated with a master page is referred to as a template page. Controls inside a template page map to placeholders IDs in the master page. The .NET runtime matches on these IDs generating the final page.
          • Site content types
            Quite often common categories of content apply to multiple sites. In WSS2 different types required separate document libraries as each document library could only have a single document template specified and one set of columns for metadata. In WSS3 multiple types of content can be associated with a single document library. The basic elements of content type are: title, document template, metadata (site columns) workflow and policies. By default content types are not enabled on a document library. This can be changed via the advanced properties of a document library.
          • Site columns
            List centric columns are suitable for situations where specific properties need to be associated with list elements but are not suitable for (all) other lists. This is a situation which often arises. In WSS2 to include a unique column for a list or library it had to be created for that list. The required title, data type, validation rules and constraints would be manually specified for each list. This was a) time consuming and b) error prone when columns were needed by multiple lists. Site columns in WSS3 address this. Site columns created at the top level site can be utilised with other sites in the site collection hierarchy.
          • Site templates
            A site template consists of lists, libraries, web part and content and allows users to store and share information targeted to supporting a business process. On installation site templates are based on site definitions that are stored in the '12 Hive': program files\common files\Microsoft Shared\web server extensions\12. We won’t go through the whole list but provided templates include the standard default team site, blog, various meeting workspaces as well as, interestingly, SharePoint central administration itself. You can also create your own.
          • List templates
            Are collections of files, metadata columns, views and web parts. Out of the box SharePoint categorizes the 15 list templates available as libraries, communications, tracking and custom lists. After the required columns, views and any other customisation have been specified a list can be saved as a list template from list settings – general settings. To make a site collection's list templates available to another site collection you can save the custom list template to the file system from the source site collection's List Template gallery and then upload it to another site collections gallery.
          • Web parts
            Web parts provide a modular and reusable functionality to a WSS3 application. In WSS3 they are based on ASP.net 2.0. This makes life much easier than previously for the WSS developer. Several web parts come with WSS3, e.g. content editor, image, etc. Custom web parts can also be created and installed to support the specific needs of an organisation. Much more of this later in this series.
          • Workflows
            There is often a need to provide support for multi stage processes where actions are taken based on previous activities being completed. WSS3 greatly enhances capabilities in this area over previous versions providing a rules based workflow engine based on .NET 3.0’s Windows Workflow Foundation (WF). In MOSS several workflow templates are available out of the box. However, in WSS3 they must be created either via SPD or via VS.net using the Designer for Windows Workflow Foundation. SPD provides 'designers' or 'information workers' with the ability to create declarative rules-based workflows for specific lists and libraries through a wizard. By the very nature of wizards the workflows created are limited. For more complex workflows VS.net Designer for WF is available.

          The first three are available to all sites but the others only to the root site of the site collection.

          MOSS Additions

          Just for comparison and information as MOSS is not the technology under primary discussion, MOSS Standard Edition includes the following:

          • Documents and records management – MOSS provides a records repository site template, auditing capabilities, out of the box workflow templates, and document converters to control how enterprise content is managed through its lifecycle
          • Enterprise search – while a full text search engine exists within WSS3, in MOSS this is extended to allow indexing of non-SharePoint content sources such as web pages, file shares, exchange folders as well as custom application content.
          • Single sign on – capabilities have been extended.
          • User profiles and audiences – the detail of personalisation is extended and support for ASP.net 2.0 membership and personalisation facilities also extends the facilities available. The Business Data Catalog (see below) also has potential impact in this area allowing import from LDAP directory sources.
          • Web content management and publishing – MOSS replaces Microsoft Content Management Server 2002 (MCMS) and hence replaces much of the functionality this product offered via allowing users to populate templated web pages.

          The Enterprise edition further provides

          • Business data catalog – provides the ability to interact with enterprise backend applications.
          • InfoPath forms server – a tool for business data collection and forms based collaboration providing users with the ability to publish InfoPath 2007 forms so they can then be completed in a browser.
          • Excel server – allows users to create, modify and share spreadsheets online via the MOSS interface.

          For all these extras you pay a great deal more. See http://office.microsoft.com/en-us/sharepointserver/FX102176831033.aspx. The great thing is that with WSS3 you can do quite a lot for 'free'.

          Summary

          This first article in the series on WSS3 introduced the product, presenting a high level look at many of the key elements of WSS3 including site collections and their constituent elements as well and hopefully started to give you an idea of what is achievable using WSS3 'out of the box'. Before we start looking at customising and extending what is supplied, both programmatically and by other means, we'll continue in the next article to look at some of the features we’ve introduced in more detail. One of the key requirements for a WSS/ MOSS architect is understanding how functionality can be delivered 'out of the box' and as a consequence when bespoke development work is required instead. This way lays optimum bang for your buck.

          References

          Developers guide to WSS3.0
          Todd Bleeker
          Charles River Media

          http://dotnetaddict.dotnetdevelopersjournal.com/moss_vs_wss.htm

          http://www.dotnetjohn.com/articles.aspx?articleid=234