If you know of any others, please let me know by using this form http://www.wssdemo.com/pages/comments.aspx
Please check the full list of sites first http://www.wssdemo.com/Pages/websites.aspx
Refrence..
Refrence..
[Updated with more detail] My list of over 1,800 SharePoint resources uses content types to distinguish the metadata that is relevant to each type of resource (article, blog, download etc.)
If the content type is KB Article, I wanted the default display item page to be customised to render the Microsoft KB Article page in an iFrame within the list item page.
A list with content type management enabled has a folder per content in which you can place views. This helps organize all the content type specific forms (Display item, New item and Edit item) into folders.

Views created in the content type folders are not shown in the default list views drop-down

You can then specify the default item view per content type by right-clicking on the list folder in SharePoint Designer and select properties to set the supporting files value for the Display item form

Even though a url might link to the default page e.g. http://www.wssdemo.com/Lists/Resources/DispForm.aspx?ID=1534
it will redirect to the custom page automatically (try it...)
My custom view page uses a Data Form web part to display a single item.
To create this in SPD, just right click on the List name and select New/List View Page.
Edit the new view, delete the List View web part and insert a Data Form as a "Single Item View" of the list
Select the list item for which you are creating the view and select "Show Data" from the drop down
The web part is filtered by the ID Parameter that will be included on the URL.
Create the Parameter from the Data View properties
Then create a filter for the Data View
and substituted the row view template code withing the DAta View web part for this...
You can include this CSS style in the page to resize the iFrame height to match the current browser height (- sharepoint chrome height).
If you aren’t familiar with My Links, it’s a great place to store those things you might normally store in your Internet Explorer Favorites or Firefox Bookmarks. The advantage to using My Links is that they are always available to you anywhere you are logged into SharePoint. So, if you log in on a different computer, your links are there. And the links can go anywhere; they don’t have to be links to SharePoint locations. Here is a screenshot of how My Links is usually accessed in SharePoint.
Yesterday, just for fun, I decided to try an experiment; and my experiment worked! I added a My LInks web part to my My Site. Then I exported it and saved it to my desktop. 
Next I went to the home page of my portal, made the page editable, and clicked on Add a Web Part for one of the web part zones. I closed the Add Web Parts dialog by clicking on the link at the bottom for the Advanced Web Part gallery and options. This opened the Add Web Parts Tool Pane in the right-hand side of my browser. At the top I clicked on the down arrow beside Browse and selected Import. 
I browsed to and selected the My_Links.dwp web part I had saved to my desktop and clicked the Upload button.

To finish, I just drug the My Links web part where I wanted it on the page and published the page. All my links were then showing up on the page and as I logged in as different test users, their links showed up as well, as expected.
refrence::http://sharepointsolutions.blogspot.com/
If you read this blog you probably know that besides the web user interface, SharePoint also exposes some interfaces which you can use from code: the SharePoint object model and the SharePoint web services. The object model of SharePoint can only be used by code/applications that are running on a SharePoint server in your Server Farm, so you can’t use the object model on client machines. The SharePoint web services can be used of course across a network boundary, that’s what they are built for! In this post I’m going to show you how you can access the out-of-the-box SharePoint web services by making use of the jQuery Javascript library. First let’s see what you can do with this technique: download this zip file that contains an ASPX page (a basic Site Page without any code behind), and the jQuery Javascript library (in case you don’t have it already). Upload the two individual files (not the zip file) in the root of a Document Library in any of your SharePoint sites. You can do this by making use of the web user interface; you don’t have to touch anything on the server itself. When done, just click on the link of the uploaded ASPX and you’ll see following page:

Probably you’re not really impressed but think about the fact that this page is just an ASPX file you’ve uploaded through the web user interface, there is absolutely no code behind involved (which would have been blocked by SharePoint’s default security settings). The details of the SharePoint lists are loaded by making use of Javascript code that calls the web SharePoint lists.asmx web service.
So how do you call a SharePoint web service in Javascript code; well you can use the XmlHttpRequest object and write lots of boring code, or you can make use of a Javascript library that wraps this XmlHttpRequest object and exposes a nice and easy interface. In this demo I’ll use the jQuery Javascript library, so the first thing that you’ll need to do is to make sure the page is loading that library:
If you already configured your SharePoint site so the jQuery library is loaded (for example by making use of the SmartTools.jQuery component), you can skip this line of course.
When the page is loaded, the Lists web service (e.g. http://yoursite/_vti_bin/lists.asmx) of SharePoint needs to be called; this can be accomplished by making use of the jQuery’s ajax method. This method can post the necessary SOAP envelope message to the Lists web service. The XML of the SOAP envelope can easily be copied from the .NET web service test form of the desired web method (e.g. http://yoursite/_vti_bin/lists.asmx?op=GetListCollection). In the code below, a call to the GetListCollection web method is made when the page is loaded. The complete parameter of the ajax method is actually a pointer to another Javascript function (which we’ll implement later on) that will be called asynchronously when the web service call is done. Don’t forget to update the url parameter with your SharePoint site’s URL!
$(document).ready(function() {
var soapEnv =
"
$.ajax({
url: "http://yoursite/_vti_bin/lists.asmx",
type: "POST",
dataType: "xml",
data: soapEnv,
complete: processResult,
contentType: "text/xml; charset=\"utf-8\""
});
});
As I already mentioned, the processResult function is called when the response XML of the web service call is received. In this method a loop is created which will iterate over every List element of the response XML. For every List element a element is added to the element with the ID attribute set to data.
function processResult(xData, status) {
$(xData.responseXML).find("List").each(function() {
$("#data").append("
});
}
This data element is the actual list in HTML:
When you put everything together in a Site Page, this is the result:

In the zip file mentioned in the beginning of this post, you can find an extended version of the processResult function which will display some additional metadata for every list (like the ID, ItemCount etc). The entire contents of basic version of the Site Page built in this post goes as follows:
<%@ Page Language="C#" MasterPageFile="~masterurl/default.master" %>
Here is the list of the SharePoint classes that I have documented on MSDN, Enjoy!
| Microsoft.SharePoint.SPSecurity.SPOperationCode | |
| Microsoft.SharePoint.Administration.SPAdministrationServiceJobDefinition | |
| Microsoft.SharePoint.Administration.SPJobDefinitionCollection | |
| Microsoft.SharePoint.Administration.SPRunningJob | |
| Microsoft.SharePoint.Administration.SPRunningJobCollection | |
| Microsoft.SharePoint.Help.SPHelpMerge | |
| Microsoft.SharePoint.WebControls.BackLinksIterator | |
| Microsoft.SharePoint.WebControls.BaseXmlDataSource | |
| Microsoft.SharePoint.WebControls.ContentDatabaseSection | |
| Microsoft.SharePoint.WebControls.ContentDatabaseSectionMode | |
| Microsoft.SharePoint.WebControls.DataTableDataSourceView | |
| Microsoft.SharePoint.WebControls.DiffSelectorIterator | |
| Microsoft.SharePoint.WebControls.GroupPermissions | |
| Microsoft.SharePoint.WebControls.IDesignTimeHtmlProvider | |
| Microsoft.SharePoint.WebControls.IFormDelegateControlSource | |
| Microsoft.SharePoint.WebControls.InputFormCheckBox | |
| Microsoft.SharePoint.WebControls.ItemHiddenVersion | |
| Microsoft.SharePoint.WebControls.IXPathNavigator | |
| Microsoft.SharePoint.WebControls.LinkSection | |
| Microsoft.SharePoint.WebControls.LinksTable | |
| Microsoft.SharePoint.WebControls.ListViewSelector | |
| Microsoft.SharePoint.WebControls.MenuSeparatorTemplate | |
| Microsoft.SharePoint.WebControls.RadioButtonChoiceField | |
| Microsoft.SharePoint.WebControls.RecentChangesIterator | |
| Microsoft.SharePoint.WebControls.RepeatedControls | |
| Microsoft.SharePoint.WebControls.ServerSelector | |
| Microsoft.SharePoint.WebControls.SiteAdministrationSelector | |
| Microsoft.SharePoint.WebControls.SiteActions | |
| Microsoft.SharePoint.WebControls.SPSqlDataSource | |
| Microsoft.SharePoint.WebControls.SPXmlDataSource | |
| Microsoft.SharePoint.WebControls.SubMenuTemplate | |
| Microsoft.SharePoint.WebControls.VersionDiffIterator | |
| Microsoft.SharePoint.WebControls.WebApplicationSelector | |
| Microsoft.SharePoint.WebControls.XmlUrlDataSource |
Unless you are living under the rock , you’d probably know that since SQL Server 2005 SP2 time frame , you can configure a deployment of SQL Server Reporting Services to work with a deployment of SharePoint - known as SSRS 2008 installation in SharePoint Integrated mode. In the first attempt to combine their Business intelligence and Information Portal technologies together and by releasing SQL Server 2005 SP2 , Microsoft brought two very interesting technologies together and opened up a world of interest to many people including myself . When I first read about SP2 , I was like wait a minute, this is awesome! Both products that I had been really passionate about for years now are getting much closer! Needless to say that I’ve always appreciated the efforts Microsoft has put into making the technology , geekyness and weirdness around it transparent to the vast majority of people out there.
When SQL Server 2005 SP2 was released , MS really demonstrated that not only do they listen to their customer feedback, they also care so much about developers and to make their life easier. For example , in the context of SharePoint and SSRS integration , now you can potentially hire a report developer,they can build the reports (in much easier way) and publish them into SharePoint and basically hand them over to the user community and business users. From here , they can take the wheel, manage and interact with these reports (high level) without having to know what the hell is going on under the hood! Isn’t that amazing that how two completely different technologies can be combined to make things much easier for everyone? Remember, easier something is, more people will use it. More people use it, more popular you’ll become! Microsoft ,for sure, has proved that they’ve learned this very simple rule of life…
The only thing that tipped me over the edge at that time was when I first attempted to bring the the best out of both products in a “real” integration project with a very “difficult-to-get-along” kind of client! (I still have the nightmare of those two days) . I really don’t want to talk about those issues here , but what made it difficult for me was no proper documentation , no active community around both products and , to an extend, the immaturity of the integration . Things certainly have changed since then and obviously I’ve learned my “integration” lessons as well! Not that I don’t face any issues these days, but nowadays it’s much easier to find an answer - and yes , I find the answers to the majority of my questions in the blogs of those who are blessed and willing to SHARE their POINTS with the rest of the world!
When SQL Server 2008 and SSRS 2008 was RTMed , I didn’t make the same mistake I had made back in 2005 ![]() . I decided to to gain some home-based lab experiences before I go live with this in real engagements (Didn’t I just tell you that I learnt my integration lessons? ;) ) Surprisingly, every installations I had at my home-based farms from a single stand-alone installation to a scale-out SSRS along with a large SharePoint Server farm went really smooth without big stucking points. Documentation around the integration is much better this time around, but I am still not happy by the coverage of SSRS 2008 and SharePoint integration by MS people and community! Let’s hope it gets better soon.
. I decided to to gain some home-based lab experiences before I go live with this in real engagements (Didn’t I just tell you that I learnt my integration lessons? ;) ) Surprisingly, every installations I had at my home-based farms from a single stand-alone installation to a scale-out SSRS along with a large SharePoint Server farm went really smooth without big stucking points. Documentation around the integration is much better this time around, but I am still not happy by the coverage of SSRS 2008 and SharePoint integration by MS people and community! Let’s hope it gets better soon.
Speaking of SSRS 2008 Add-in for SharePoint, here is one question that I frequently get asked :
I have configured report server in SharePoint integrated mode. I have installed SharePoint Web front-end components on the report server computer.I have downloaded and installed the Reporting Services Add-in for SharePoint Technologies on my other Web front-end servers (including the one that hosts the Central administation site) , but Reporting Services section doesn’t appear in the Central Administration site;therefore I cannot complete the integration. Where did it go?
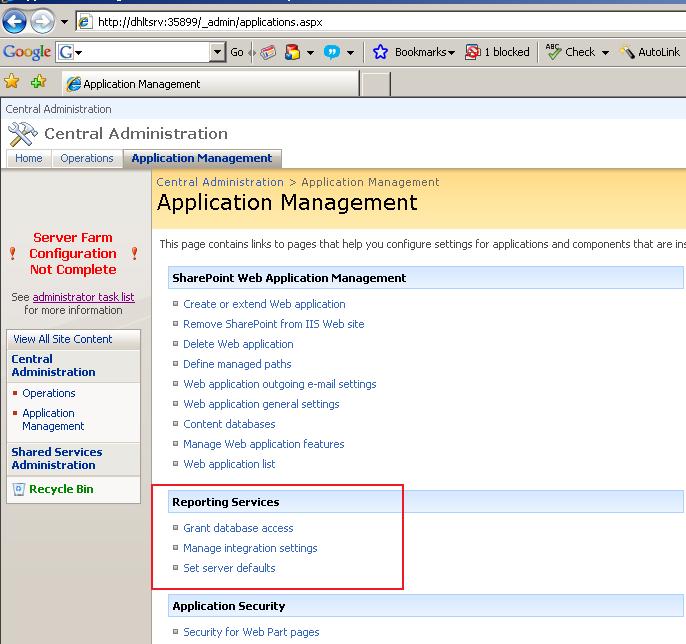
Well , the answer is : You need to activate a site collection-scoped feature called Report Server Integration Feature on the Central Administration site.

This feature has two different behaviors when gets activated on Central administration site than other sites. When activated on the Central administration site , the feature does all of the things it does for other type of sites , plus it adds a section called Reporting Services under the Application Management. This section must be used to make sure SharePoint is aware of my SSRS instance existence. Here is where the fun part starts ![]() .
.
There are three options in this section:
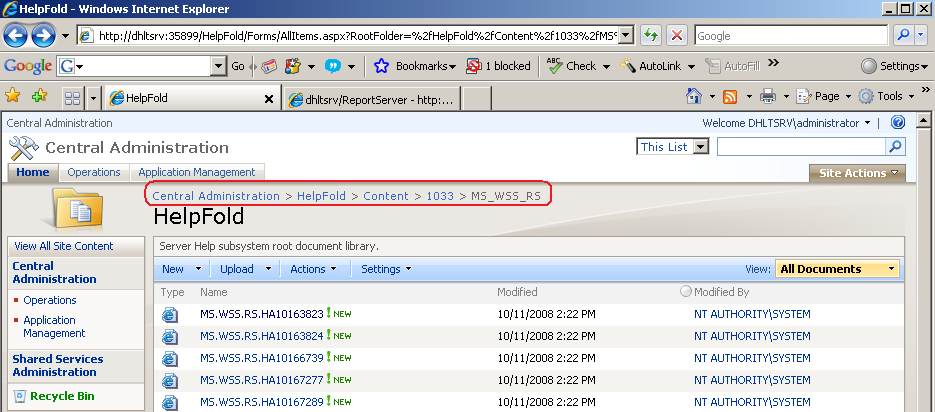
There is one more action that Reporting Services Add-in for SharePoint Technologies performs on the Central Administration site which is provisioning SSRS integrated help content in the HelpFold folder:
The add-in also installs some application pages, including pages that you open in Central Administration to set the report server URL and other integration settings in Central Administration and other sites.

In addition to the application pages , the Proxy endpoints are also placed in the 12\ISAPI\ReportServer folder. As you can tell , all of the Reporting Services Proxy endpoints are nicely virtualized and context aware (note wsdl and disco aspx file for each Web service). This means that no matter how deep you are in each site collection , these endpoints are always accessible via a call to the respective asmx file - for example http://mysite/_vti_bin/ReportServer/ReportServer2006.asmx or http://mysite/subsite1/…../subsiteN/_vti_bin/ReportServer/ReportServer2006.asmx.
More on SSRS Proxy endpoints in the Integrated mode can be found here.

A quick list of proxy endpoints here:
All right , let’s just go ahead and see what happens to non-Central admin sites :
First of all , the same feature that we just activated in the Central administration site appears on every site collection meaning that if you want to have the Reporting Services integration , you need to activate this on each site collection: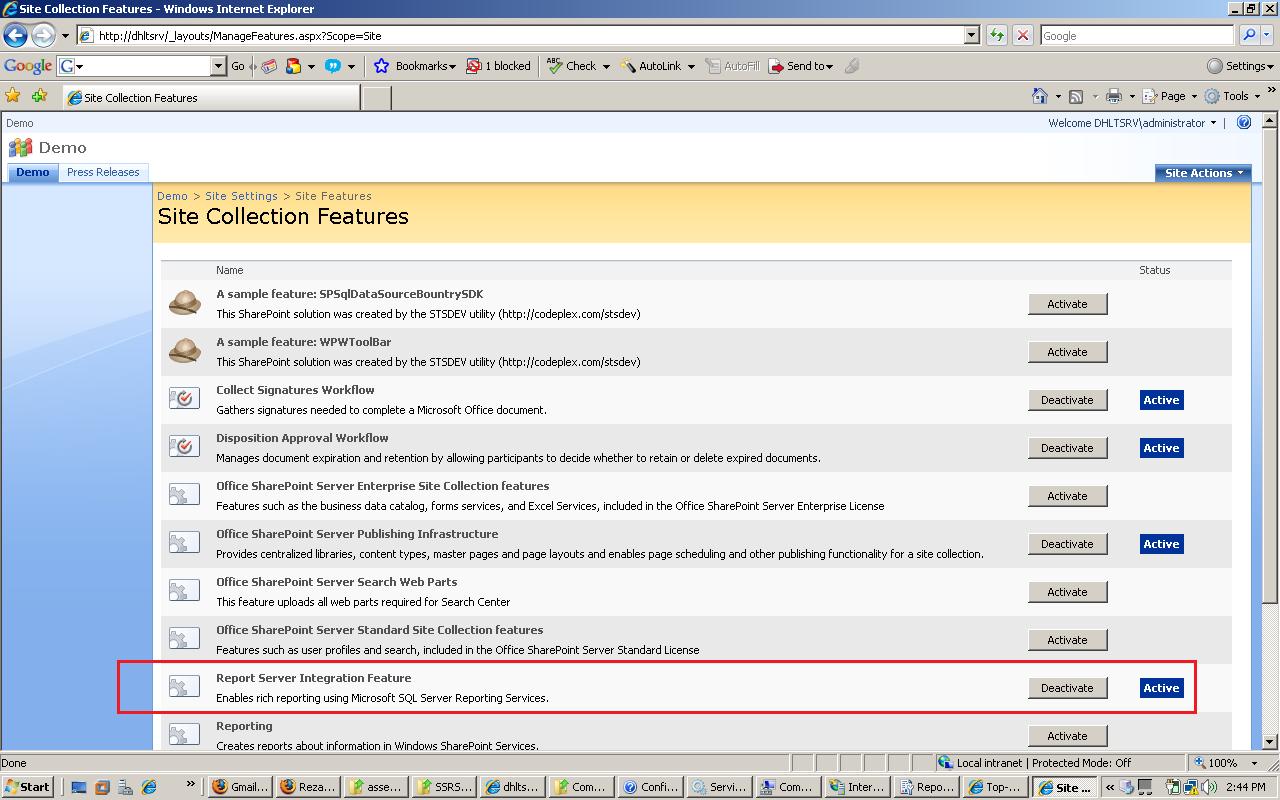
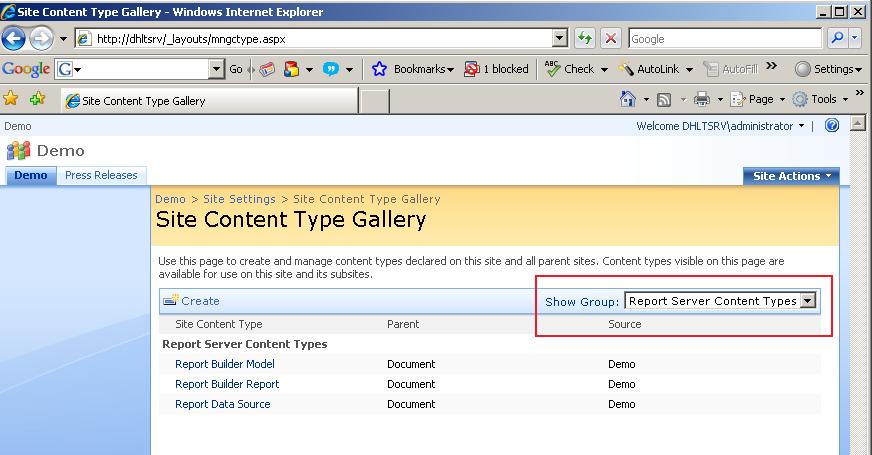
Once you activate this feature , the following things will be added to your site collection:
Required content types:
Report Viewer Web part:

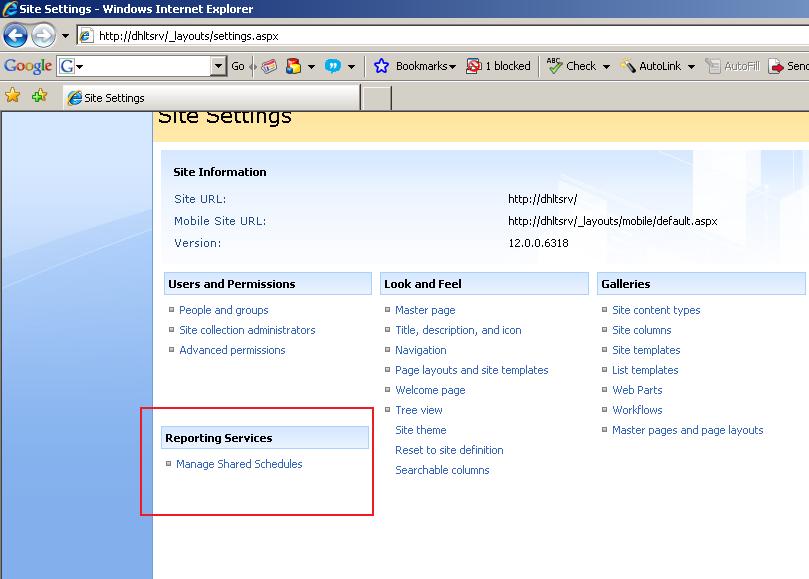
A section in the Site Settings for managing shared schedules :
Obviously if you want to be able to store your reports in a Report Library and your data sources in Data Connection Library , you need to enable another web-scoped “Office SharePoint Server Enterprise Site features” feature to get Report Library and Data Connection Library in the create page. This has nothing to do with SSRS Add-in though !

That’s all about it! I hope this blog post can help you verify your SSRS 2008 installation in integration mode.
refrence::
In the first part of this article I'll talk about how you can enable the jQuery JavaScript library in SharePoint 2007 sites and pages. The second part of this article will focus on using jQuery in SharePoint 2007 sites and pages.
When I was at PDC’08, I attended a session about the jQuery JavaScript library (watch online). A few weeks before that Scott Guthrie announced that Microsoft would support, and even ship jQuery together with Visual Studio, along with Microsoft’s own AJAX implementation: ASP.NET AJAX. If you’ve never heard about jQuery, I defenitly recommend you to to check it out, there are some great tutorials available. The defenition of jQuery reads: "jQuery is a fast and concise JavaScript Library that simplifies HTML document traversing, event handling, animating, and Ajax interactions for rapid web development. jQuery is designed to change the way that you write JavaScript." In my opinion jQuery is great because it simplifies a lot the JavaScript that you have to write if you’d like to do fancy AJAX stuff, selecting HTML elements for example is a breeze. Secondly jQuery has a big community that develops plugins for various scenarios. I already wrote and talked quite a bit about integrating ASP.NET AJAX with SharePoint 2007, so let’s check out how you can integrate jQuery as well!
First things first: you need to get the jQuery library from the official website. It comes in three varieties: uncompressed (with debug information, use it while you develop), packed (smaller, use it for production) and minified (needs to be uncompressed at the client, so slower but even smaller). The jQuery library is just a JavaScript (JS) file, so it can be loaded from any web page (html, aspx, etc). If you’d like to have IntelliSense when writing code in Visual Studio 2008 for jQuery (highly recommended of course), you need to download a Visual Studio hotfix. Now you’re good to go to make use of jQuery in your development environment.
Before I show you some things you can accomplish with jQuery in your SharePoint sites, let’s think about how we can make the jQuery library available on the ASPX pages of our SharePoint sites. There are two things that need to be done: first the JS file (the library itself) should be deployed to a location which can be accessed by SharePoint pages, secondly the library should be loaded by the SharePoint pages.
Deploying the jQuery JS file is quite easy: I recommend deploying it to the C:\Program Files\Common Files\Microsoft Shared\web server extensions\12\TEMPLATE\LAYOUTS folder on every Front End Web Server of your SharePoint Server Farm. By doing so, the file can be loaded by making use of the URL http://yoursite/_layouts/ jquery-1.2.6.min.js or http://yoursite/subsite/_layouts/ jquery-1.2.6.min.js, since the _layouts part of the URL always points to the LAYOUTS folder in the 12-hive.
Making sure that SharePoint pages will load the library can be accomplished in a couple of ways:
1) Load the library in the page you want to use it
This can be done very easily by adding for example a Content Editor Web Part to the page (or modifying the page with an editor), containing the following HTML:
2) Add the script to the master page
You can add the same script tag to the master page that is used by your SharePoint sites as well, typically in the HEAD tag:
. . .
. . .
This may look very easy, but remember modifying out-of-the-box files in the 12 hive is typically not supported. So if your sites use the default master page, this is a no-go. Additionally it could be that you’ve to multiple master pages (e.g. system and site master pages) which complicate the situation.
3) Use the AdditionalPageHead Delegate Control (my favorite!)
By providing the contents for the AdditionalPageHead Delegate Control that is used by all the out-of-the-box master pages, you can make sure the the jQuery library is loaded by all the SharePoint pages. The AdditionalPageHead Delegate Control allows multiple controls to provide contents, so it’s a great extensibility scenario. To accomplish this you need to build a web user control (ASCX file), that contains the script tag to load the jQuery library:
<%@ Control Language="VB" ClassName="jQueryControl" %>
There is no code-behind file required. This control needs to be deployed to the C:\Program Files\Common Files\Microsoft Shared\web server extensions\12\TEMPLATE\CONTROLTEMPLATES folder on the hard drive of every SharePoint Front End Web Server. Additionally you need to have a feature that will add the control to the AdditionalPageHead Delegate Control, the feature’s manifest will look like this (assuming the control is named jQueryControl.ascx):
The feature can be scoped to any level, when it’s activated on a certain level, all the pages will automatically have the script tag in their HEAD tags. Pretty cool, isn’t it?
You can do all of this manually, but it’s of course much nicer to package the jQuery library JS file, the user control and the corresponding feature into a SharePoint Solution (WSP). I’ve created a sample Solution file, that contains a feature scoped to the Web level so the jQuery library can easily be deployed and enabled or disabled per SharePoint site. There is also an installer available that guides you through the installation process by making use of a nice wizard. You can find the solution, installer and sources as a part of the SmartTools project on CodePlex (direct link to the releases).
Ok, now we are ready to make use of jQuery in our SharePoint sites, in the second part of this article I'll show you some cool stuff you can do by integrating jQuery with SharePoint 2007.
Refrence ::